Blog

Blockchain as a Service (BaaS – Azure) : Part 2

This blog article is written post the introductory article on Blockchain. It is recommended you read the introduction before continuing 😊

In this article you will learn about the

  1. The evolution of Blockchain
  2. What are smart contracts
  3. What are nodes in blockchain and what are the types
  4. At what stage is the technology at present

Blockchain when applied to use case scenarios addresses satisfactorily a substantial latent pain that exists across industries. Blockchain or more accurately a distributed ledger allows organizations to work together in highly competitive markets. Existing inter-company transactions carry enormous costs in process, procedure and cross-checking of records to come to settlement on what could turn out to be a trivial exercise using blockchain technology. Blockchain could streamline the way business operates, the same way the web did, giving birth to a new collaborative economy.

The evolution of Blockchain

The below diagrams depict the evolution of Blockchain.

evolution2

evolution

Blockchain 1.0

Blockchain 1.0 is a simple ledger, which records any kind of transactions in sequence. It represents the state of the network at any given moment. Although it was intended to record, financial transactions, the you could encrypt any kind of transactions by putting it on the Blockchain. This could mean photographs, agreements etc. Bitcoins Blockchain is often referred to as Blockchain 1.0. Bitcoin, Hyperledger, Unspent Transaction Output-based protocols (UTXO) platforms fall into Blockchain 1.0.

The below diagram indicates that Blockchain is a simple distributed ledger that records all transactions. Its state being duplicated across all users in the network.

bc1

Blockchain 2.0: Smart Contracts

When distributed ledgers (Blockchain 1.0) has an additional level of logic on top –it is known as the smart contract. The code exists alongside the data in the database. The smart contract is Blockchain 2.0 or Ethereum.

Smart contracts operate like tokenized programs. They have public keys and they have code and can ‘do’ things like a stored procedure in a RDMS (Relational Database Management System) would.

Smart Contracts guarantee a specific set of outcomes based on the code on which it is written. There is no room for confusion or need for litigation. A smart contract is writing a piece of code into the blockchain. And this code would get executed or move to the next step if and only if the requirements in the code is met and accurately fulfilled. This can be compared to a Domino effect, where a set of specific actions are required for each block to fall.

A smart contract is an account that is controlled by code, rather than an account that is controlled by a user. If there is a typo on the code that governs the smart contract hosted in the Blockchain, editing the smart contract would not be possible. Instead a brand new smart contract with the right code would need to be created.

Smart Contracts are written using the solidity programming language. Decentralized apps are created using one or more smart contracts. Smart contracts are programs that run exactly as programmed without any possibility of downtime, censorship, fraud or third-party interface. In Ethereum, smart contracts can be written using several programming languages m including solidity, LLL and Serpent. Solidity is the most popular of those languages. Ethereum has an internal currency called ether, to deploy smart contracts or to call their methods we need ether. Both user accounts and smart contracts can hold ether.

Ethereum uses blockchain data structure and proof-of-word consensus protocol. A method of smart contract can be invoked via a transaction or via another method

smartcontracts

Types of nodes

There are two kinds of nodes in the network, regular nodes and miners. Regular nodes are the ones that just have a copy of the blockchain, whereas miners build the blockchain by mining blocks.

Blockchain 3.0: Project Bletchley

In Project Bletchley, Azure provides the fabric for blockchain, serving as the cloud platform where distributed applications are built and delivered. Azure supports a variety of Blockchain protocols including the below: –

  1. Unspent Transaction Output-based protocols (UTXO) like Hyperledger
  2. Smart Contracts based protocols like Ethereum

The two new concepts that are introduced with Project Bletchley are Blockchain Middleware and Cryptlets.

Blockchain Middleware

This is used to define the section that takes care of the core services that the Blockchain technology will run on. This includes: –

  • Identity and Operations Management
  • Data and Intelligent services like analytics and machine learning

This piece ensures security and immutability of the platform on which Blockchain runs.

Cryptlets

Cryptlets is the building block in Project Bletchley that enables secure interoperation and communication between Microsoft Azure, the middleware mentioned in the above section and customer technologies. Cryptlets function when additional information is needed to execute a transaction or contract based on a date or time and providing market data. They then become a critical component of the sophisticated Blockchain systems enabling all technology to work together in highly secure and scalable way. It is the answer to security within the Blockchain

cryptlets

In the next article lets talk about decentralized apps. If you would like clear information about a concept in Blockchain, comment below!

Microsoft Business Application Platform

Providing a one-low-code ecosystem with unlimited application opportunities

To save you some time, go ahead and read the below article if you would like answers to the below questions 😊

  1. How can a business user drive digital transformation?
  2. How do these applications save time and cost less?

How can a business user drive digital transformation?

By making the most use of the Microsoft Business Application Platform! The Business Application Platform is a combination of 3 products that sits on top of an enhanced data layer. The 3 products, being Power BI, PowerApps and Flow. The enhanced data layer is the CDS (Common Data Service).

Pic1

Power BI

Go from massive connected data to interactive visualizations using Power BI.

  1. Create insightful reports and dashboards you could share throughout your organization ad that can be viewed in the web, mobile or tablet.
  2. You can pull data from hundreds of data sources allowing you to drive ad hoc analysis even on your mobile device.
  3. These dashboards and the underlying data is protected with built-in security.

Pic2

PowerApps

PowerApps is the service that allows users to create apps with virtually low-code or even no-code scenarios! The PowerApps studio provides a very intuitive experience that allows even business users to create apps on the go.

Moreover, these applications are available across Windows, iOS, Android and the web. You could: –

  1. Pull data from sources such as chatter, Salesforce, Dynamics365, Facebook, SharePoint Lists, etc.
  2. You could also incorporate device features like camera, GPS location, Barcode scanners etc.

Pic3

Flow

Microsoft Flow allows you to make repetitive tasks easier. Whether the tasks may be internal business processes or sending customers a survey form post purchase.

There are several templates available that gives you an opportunity to test the product. You can find the below templates here.

Pic4

How do these applications save time and cost less?

Imagine not having to share excel reports, over email to members in your organization? Create a dashboard that pulls data and allows users to access power rich Power BI reports over the web, mobile or tablet.

Power BI comes in three versions: –

  1. Power BI for desktop
  2. Power BI Pro
  3. Power BI Premium

For pricing details, you can go to this link.

Pic5

Imagine not having to wait between 3 -12 months for an application to be available across users in your organization? What if Apps could be created cross platform in a month or less?

For pricing details, you can go to this link.

Pic6


Blockchain as a Service (BaaS- Azure) Introduction

Just to save you some time – read the article if you would like answers to the below questions 😊

  • What is Blockchain?
  • What is Blockchain a solution to?
  • Different types of Blockchain
  • Why is Blockchain secure?
  • How does blocks get built in a ‘Block-chain’?


Happy reading!

What is Blockchain

In physical terms – Blockchain is essentially a network of computers. Each computer in the network accepts, confirms and stores transactions in a synchronized chain of confirmed transaction blocks. Each block applies cryptographic proofs and hashes – thus making the blocks / transactions in the blockchain / network immutable.

Pic1

What is Blockchain a solution to?

 Blockchain allows for all parties involved to agree on the current state of something of value without any possibilities for dispute.

Blockchain caters to the above need perfectly because: –

  1. It is immutable – Transactions; remain on the blockchain; it is not possible to reverse a transaction
  2. Every node on the blockchain holds all the transaction entries – it is based on the concept of decentralized ledger
  3. It eliminates the need for a third-party and is completely secure.

Pic2

Example: –

  1. How many owners does a specific house have?

In the present world we would need to believe the middle-man who sells us the house considering that:-

  1. The data could be tampered with
  2. Owners may not necessarily be honest about their ownership

Blockchain not just eliminates the need for having to blindly trust a third party but it also creates a database that is secure, immutable and can be trusted.

Different types of Blockchain

Pic3

Public

  • All the participants are anonymous
  • Reads and writes by all participants
  • Consensys by proof of work (Mining)

Private

  • All the participants are from one organization
  • Write permissions are centralized
  • Reads maybe public / restricted
  • Multiple algorithms for Consensys

Consortium / Federated

  • Known participants from multiple organizations
  • Writes require Consensys of n participants
  • Reads maybe public or restricted
  • Multiple algorithms for consensys

Another classification of Blockchain is permission less and permissioned ledger

Pic4

When users can join the blockchain without permission, it is called permission less ledger. Anonymous parties can read or write into the blockchain. Examples include Bitcoin and Ethereum.

Permissioned ledger can be written into or read only by pre-approved parties.

Why is Blockchain secure?

The answer to this is that data is hashed.

Hashing is defined as creating a fixed length, random string of data known as a digest, that uniquely represents a data set of arbitrary data length. This mean to creating a unique identifier for that set of data. The source data can be any length at all and the hash, the fixed (usually 256 bits long) ‘hash’ is always the same length and is always the same value and that value is always unique.

Most importantly these functions are one-way meaning that if you have the digest there is no way to calculate the original source data.

Pic5

Composite objects – Hashing objects

Pic6

The hashing capability can be used to create composite hashes that uniquely identifies a composite object. For example, in the diagram below the composite objects of a mobile phone could have individual hash values such as screen, memory, disk etc., disk etc.

When we hash those components together we get a new digest that uniquely represents that mobile phone. This becomes even more useful if we can determine if one digest forms part of composite digest.

How does blocks get built in a Block-chain?

The very first block in a block chain is called the Genesis block. It holds the identifier and the configuration information used by the network. It contains the first hash.

Mining refers to the computational activity on each block of the block-chain. It is the process of adding transaction records to the blockchain.

To create a new blockchain network, we need the first block. It’s called the genesis block and it holds identifier and configuration information used by the network. But importantly, it holds the first hash, as previously mentioned.

This genesis block is also required by any new nodes that need to join the network. They must be provided the genesis block so that they understand the configuration for the network, but also so that they have the first hash and can participate in mining.

So this is at time 0, when I start the network, at this point nodes can accept transactions. These transactions could be the creation of accounts, the movement of ether, the creation of a smart contract, any transaction that could change the state of the blockchain.

Then, at the time configured for the network, in this example 12 seconds. The network mines the next block. This block is a hash calculated by combining hashes of the transactions executed between the last block and now, plus the hash from the previous block and a nonce (if that is what the consensus algorithm requires.

The block is accepted by the network and so we have the first two links in our chain, block 0, no transactions and block 1, with 2 transactions and a unique hash that is based on those transactions and, importantly, the previous blocks hash.

And so, this continues, every 12 seconds in this case, whether there are transactions or not, a block will be generated.

Pic7

In the next article lets learn about Smart contracts and a few more concepts 😊

Microsoft Common Data Service : CDS

Before you go ahead, read this article if you would like the below questions answered: –

  1. What business problem does the CDS solve?
  2. How does the common Data Service(CDS) work?
  3. How can I get access to it?

Business Pain points

CDS brings together all data from different departments/ databases into 1 repository

CDS provides accurate end-to-end views of data from across systems

Today, even mature companies face issues of ‘disconnected data’. HR holds different attributes about the same set of data as Finance does. How would it look if in one place we can find information about an employee from every aspect (HR, Finance, Sales Performance etc.)

Pic1

How does CDS work?


At the core of the common data service is the Common Data Model.

The common data model comes prepopulated with many business entities that are useful across a variety of business and application domains. These entities can be used by apps built atop the common data service via Power apps or the common data service SDK. The common data model is fully extensible – you can add fields to any of the entities that come with the Common Data Service.

In the power apps portal, (subscribed to the P1 or the P2 plan) you would see the CDS section as seen below in the snapshot. Although there are business entities in CDS, as a power user, you can go ahead and create entities of your own.

The benefit of the common data model is that applications can work against data without needing to explicitly know where that data is coming from

Pic2

The out of the box entities are grouped into categories as you see in the above snapshot. The below table details each Functional Group/Category.

Functional Group Description
Customer service The customer service entities manage issues from your customers, including tracking, escalation, and documentation.
Foundation The Foundation entities contain information that is relevant to nearly every other entity group. This group contains entities such as Address and Currency.
Human resources The human resources entities let you manage employment information, jobs, leaves, and positions.
Person, organization, and group These entities encompass a rich set of people and organizations that you might interact with, including workers, vendors, tenants, fans, alumni, and families.
Productivity The productivity entities let you track events and messages.
Purchasing The Purchasing entities let you create purchasing solutions.
Sales The Sales entities let you create end-to-end sales solutions, from tracking leads and opportunities, to following through with contacts, to accepting and delivering orders, to sending invoices.


CDS is based on role-based-security. Data in CDS can be secured at the below levels.

  1. Database Level: Admins can define which users can perform all admin operations in the CDS
  2. Entity Level: Admins can define which users have access to entities and what actions those users can take on those entities.
  3. Record Level: Admins can use policies to define which record a user has access to in each entity.

Additionally, the common data service provides key capabilities over the common data model including:

  1. Build apps with PowerApps
  2. Build apps with Common Data Service SDK
  3. Automate Business Process with Microsoft Flow
  4. Security

How do I get access to CDS?

If you are a user of Office 365 and Dynamics 365; – CDs is available in select O365 and Dynamics 365 plans. Details on licensing can be found here. Also check the below snapshot.

Pic3

In summary: CDS brings together your data from Dynamics 365, Office 365, and Azure Active Directory into one place.

Pic4

Role-Based Access Control in Azure AD

Definition of RBAC

For large organizations that have multiple resources that are grouped into resource groups, granting the right permissions to the right person is what RBAC achieves. Azure RBAC provides fine-grained access management in Azure. An example would be allowing a user to manage VMs in a subscription while another to manage SQL DBs within the same subscription.

Pic1

Every Azure Subscription is associated with an Azure AD. And every azure subscription has multiple resources or resource groups. Resource Groups are logical containers of resources.

Role based Access control provides the ability to grant required access to the right people of varying job descriptions.

For example, let’s say Resource Group 1 contains 2 resources, a SQL DB and multiple VMs. At a resource group level – User 1 is given the SQL DB contributor role while User 2 is given the VM Contributor role.

Resource Group User Role
Resource Group 1 User 1 SQL DB contributor (Built-In role)

Can manage SQL servers and databases, but not their security-related policies

Resource Group 1 User 2 Virtual Machine Contributor (Built-In role)

Can manage virtual machines, but not the virtual network or storage account to which they are connected

Note: Azure RBAC cannot authorize data level operations for Azure Resources. For example, the user who has the role SQL DB contributor can manage the SQL DB – it would not give permissions to manage distinct tables within the SQL DB.

Built in Roles

Azure RBAC has three basic rules that apply to all role types.

  1. Owner: A person with an ‘Owner’ access has full access to all resources including the right to delegate access to others.
  2. Contributor: A person with a ‘Contributor’ access can create and manage all types of Azure resources but can’t grant access to others.
  3. Reader: A person with a ‘Reader’ access can view existing Azure Resources.

Pic2

The rest of the below built in Roles allows management of specific Azure resources.

Role name Description
API Management Service Contributor Can manage API Management service and the APIs
API Management Service Operator Role Can manage API Management service, but not the APIs themselves
API Management Service Reader Role Read-only access to API Management service and APIs
Application Insights Component Contributor Can manage Application Insights components
Automation Operator Able to start, stop, suspend, and resume jobs
Backup Contributor Can manage backup in Recovery Services vault
Backup Operator Can manage backup except removing backup, in Recovery Services vault
Backup Reader Can view all backup management services
Billing Reader Can view all billing information
BizTalk Contributor Can manage BizTalk services
ClearDB MySQL DB Contributor Can manage ClearDB MySQL databases
Contributor Can manage everything except access.
Data Factory Contributor Can create and manage data factories, and child resources within them.
DevTest Labs User Can view everything and connect, start, restart, and shutdown virtual machines
DNS Zone Contributor Can manage DNS zones and records
Azure Cosmos DB Account Contributor Can manage Azure Cosmos DB accounts
Intelligent Systems Account Contributor Can manage Intelligent Systems accounts
Logic App Contributor Can manage all aspects of a Logic App, but not create a new one.
Logic App Operator Can start and stop workflows defined within a Logic App.
Monitoring Reader Can read all monitoring data
Monitoring Contributor Can read monitoring data and edit monitoring settings
Network Contributor Can manage all network resources
New Relic APM Account Contributor Can manage New Relic Application Performance Management accounts and applications
Owner Can manage everything, including access
Reader Can view everything, but can’t make changes
Redis Cache Contributor Can manage Redis caches
Scheduler Job Collections Contributor Can manage scheduler job collections
Search Service Contributor Can manage search services
Security Manager Can manage security components, security policies, and virtual machines
Site Recovery Contributor Can manage Site Recovery in Recovery Services vault
Site Recovery Operator Can manage failover and failback operations Site Recovery in Recovery Services vault
Site Recovery Reader Can view all Site Recovery management operations
SQL DB Contributor Can manage SQL databases, but not their security-related policies
SQL Security Manager Can manage the security-related policies of SQL servers and databases
SQL Server Contributor Can manage SQL servers and databases, but not their security-related policies
Classic Storage Account Contributor Can manage classic storage accounts
Storage Account Contributor Can manage storage accounts
Support Request Contributor Can create and manage support requests
User Access Administrator Can manage user access to Azure resources
Classic Virtual Machine Contributor Can manage classic virtual machines, but not the virtual network or storage account to which they are connected
Virtual Machine Contributor Can manage virtual machines, but not the virtual network or storage account to which they are connected
Classic Network Contributor Can manage classic virtual networks and reserved IPs
Web Plan Contributor Can manage web plans
Website Contributor Can manage websites, but not the web plans to which they are connected


Assigning a RBAC role to a user

In this example – I have created a Windows Server 2016 machine and assigned a role to a user within the company.

Step 1: Click on the Access control blade of the respected resource / Resource Group

Step 2: Click on Add on the top right section of the blade

Step 3: Choose one of the built in Roles

Step 4: Assign the role to either of the below options: –

  • Azure AD user, Group, Application
  • Virtual Machine

Step 5: Review the roles assigned to users in your IAM Blade as below.

Pic3

Pic4

Custom Roles in RBAC

Apart from the built-in roles, Azure provides users with the ability to create new roles if the ones available do not serve the purpose.

Custom Roles can be created using one of the below methods: –

  1. Azure PowerShell
  2. Azure Command-Line Interface
  3. REST API

Additional Resources


Azure AD Conditional Access

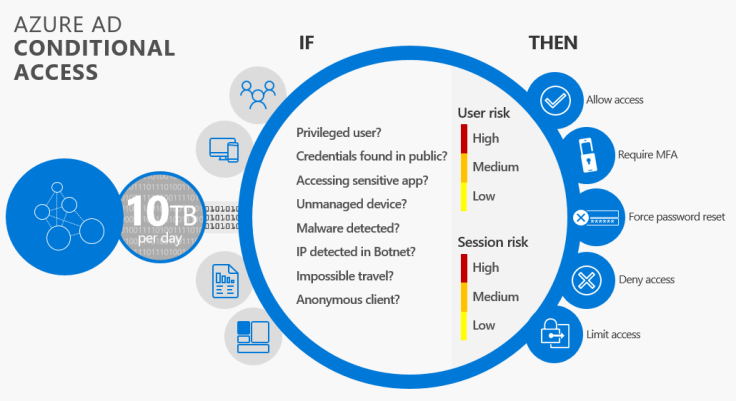
Conditional access is a capability of Azure Active Directory that ensures that the right people get access to the right resources under the right conditions. This allows the admin to control how the right people access the resources and if not, the ability to deny access. For instance, what if one of your users accesses a cloud application from a highly risky IP or from a network that is not trusted? Would your application data and the user’s credentials be secure?

These questions can be addressed using conditional access. It allows you to enforce controls on the access to apps in your environment based on specific conditions. You can add additional requirements to allow access or ensure to block access if a certain criterion is not met. For example, you can ensure that users do NOT get access to sensitive data if they are accessing from a non-trusted network.

Pic1

The above is the conditional access policy that can be configured in Azure Active Directory. The conditional access policy can be translated into:-

Pic2

This means that: –

  • When this happens = Condition Statement = ‘If users access Dynamics365 from a non-trusted network’


  1. Then do this = Control = ‘Block access’

The combination of a conditional statement with a control is together called the conditional access policy.

The conditional access policies are found under the ‘Conditional Access’ section under ‘Security’ when you open your Azure Active Directory as shown in the snapshot below.

Pic3

There are conditions and controls that you can utilize to grant access to personal and sensitive data in a fine-grained manner. These include:

Group membership – this allows to control a user’s access based on membership in a group.

Location – Use the location of the user to trigger multi-factor authentication, and use block controls when a user is not on a trusted network.

Device platform – Use the device platform, such as iOS, Android, Windows Mobile, or Windows, as a condition for applying policy.

Pic4

Applications protected by Conditional Access

Azure Active Directory Conditional Access protects every application and not only Dynamics O365 and SharePoint. Any cloud, any application without a VPN. This is keeping in mind that a customer’s environment is heterogenous. Conditional access is provided to the below Microsoft Cloud Apps:-

  • Azure Information Protection
  • Azure Remote App
  • Dynamics 365
  • Yammer
  • Exchange Online
  • SharePoint
  • Power BI
  • Visual Studio Team Services
  • Teams

Other non-Microsoft applications include:-

  • Azure-AD connected applications
  • Line-of-Business Applications
  • Applications that use Azure AD application proxy
  • Applications that use password single-sign-on
  • Pre-integrated federated software as a service (SaaS) application

Pic5

Creating your first Bot in .NET (Free!)

What will you need: –

  1. Create your Bot – Visual Studio Community 2017
  2. Test your Bot – Bot Framework Emulator
  3. Azure Subscription – To host your Bot Service ; Get your Free 30 day trial version here.
  4. Account in the Bot framework Portal – To register your Bot here.

All the above options are free, you would need to spend time and not money to gain this knowledge 😊

To reiterate from the previous article, the below are the options available during each phase of creating a Bot.

Pic1

Visual Studio Community 2017

This is a free version of Visual Studio that you can download from here.

Download the Bot Application, Bot Controller, and Bot Dialog .zip files. Install the templates by copying the zip files to your Visual Studio 2017 project Templates. Visual Studio 2017 project templates directory is typically located at

%USERPROFILE%\Documents\Visual Studio 2017\Templates\ProjectTemplates\Visual C#\

Create your Bot

Open Visual Studio and create a new C# project. Choose the Bot Application template for your new project.

Pic2

By using the Bot application template, you’re creating a project that already contains all the components that are required to build a sample Bot, including a reference to the Bot builder SDK for .NET. Verify that your project references the latest version of the SDK.

  1. Right-click on the project and select Manage NuGet Packages.
  2. In the Browse tab, type “Microsoft.Bot.Builder”.
  3. Locate the Microsoft.Bot.Builder package in the list of search results, and click the Update button for that package.
  4. Follow the prompts to accept the changes and update the package.

Thanks to the Bot Application template, your project contains all the code that’s necessary to create the bot in this tutorial. You won’t need to write any additional code. However, before we move on to testing your bot, take a quick look at some of the code that the Bot Application template provided.

Explore the code

First, the Post method within Controllers\MessagesController.cs receives the message from the user and invokes the root dialog.

Pic3

The root dialog processes the message and generates a response. The MessageReceivedAsync method within Dialogs\RootDialog.cs sends a reply that echos back the user’s message, prefixed with the text ‘You sent’ and ending in the text ‘which was ## characters’, where ## represents the number of characters in the user’s message

Pic4

Test your Bot

Download the Bot Framework Emulator. This is a desktop application that allows you to test your Bot.

Run your Bot

After installing the emulator, start your bot in Visual Studio by using a browser as the application host. This Visual Studio screenshot shows that the bot will launch in Microsoft Edge when the run button is clicked. This runs on IIS express and the default port number is 3979.

Pic5

Pic6

Start the emulator and connect your bot

At this point, your bot is running locally. Next, start the emulator and then connect to your bot in the emulator:

  1. Type http://localhost:port-number/api/messages into the address bar, where port-number matches the port number shown in the browser where your application is running.

Click Connect. You won’t need to specify Microsoft App ID and Microsoft App Password. You can leave these fields blank for now. You’ll get this information later when you register your bot.
Pic7

Test your bot by writing something to your Bot.

Pic8

Now that your Bot is functional – you need to register your bot and then deploy your project to Azure.

Register your Bot on the Bot Framework

This step is done to connect your code to the Bot Framework. We get three properties once we register our Bot

  1. Bot ID
  2. Microsoft App ID
  3. Microsoft App Password

You would need to extract this information from the Bot Framework and then input it , in the web.config file of Visual Studio.

Pic9

Pic10

To create a bot, go ahead and click on ‘My Bot’. Post which go ahead and create a bot. Click on Create a bot with the bot builder SDK. And then click on ‘Register an existing Bot using Bot Builder SDK’

Pic11

Pic12

Pic13

Once you have these three fields, go ahead and insert them into the web.config file.

Pic14

Now the connection between the code and the Bot is made – which is registered on the Bot Framework portal.

Publish your Web App on Azure

You can publish your code to Azure by using the ‘Publish’ option in Visual Studio

Pic15

As a target choose the Microsoft Azure App Service.

Pic16

After you choose a name for your app , go ahead and change the type of app to a ‘Web App’

Pic17

By default, the web app is configured as a ‘Release’ version. Go ahead and change that option to ‘Deploy’ that would enable you to debug your Bot.

Pic18


Pic19

Once you publish the Web API , you would find it in the resource group mentioned above. Once you click on the web app in your Azure portal, extract the URL as shown in the snapshot below.

Pic20

You get the app name from the above URL as aishwaryabot.

Connect your Azure Web app to the Registered Bot

Enter the messaging endpoint in the Microsoft Bot Framework in the settings section of your Bot you registered in the earlier step.

The format of the messaging endpoint should be:-

https://<appname&gt;.azurewebsites.net/api/messages

And Save the changes.

Now test the bot through the Microsoft Bot framework – by connecting to channels and using the test option as shown in the screenshot below

Pic21

Conclusion

  1. You have created a Bot on Visual Studio
  2. Published your .Net code on Azure
  3. Registered a Bot and connected it to the Web app deployed in Azure
  4. Tested it in the Bot Framework and the Bot Emulator

Hope you have been able to create your first .NET bot using this article.


(Microsoft) Core Concepts to building complex Bots

Through this article lets delve into a a high-level overview of how bots can be created. Let’s understand the different methods that are available to Build, Test, Register, connect to channels and make Bots smarter.

Pic1

What is the Bot framework?

The Bot framework by Microsoft provides us with a platform to build and connect intelligent bots that interact naturally wherever your users are talking (Skype, Facebook, Slack, Web Chat Etc.). It is a collection of tools that help you to build, deploy and publish bots.

A few of the tools that build the framework are: –

  1. Azure Bot Service
  2. Bot Builder SDK
  3. Bot Framework Portal
  4. Bot Connector

Pic2

Azure Bot Service

Services provided in Azure that allows you to create, code, register, publish, connect to channels and test from your Azure portal.

The Azure Bot Service provides an integrated environment purpose built for bot development. The Azure bot service accelerates bot development with five bot templates you can choose from when you create a bot. You can further modify your bot directly using the Azure Editor or in an integrated Development environment (IDE) such as Visual Studio.

Bot Builder SDK

To help users build Bots with C# or JavaScript, the Bot framework includes the Bot Builder SDK. The SDK provides libraries, samples and tools to help you build and debug bots. The SDK contains built-in dialogs to handle user interaction ranging from a simple Yes/No to complex disambiguation. Built-in recognizers and event handlers help guide the user through conversation.

Bot Framework Portal

At this link: https://dev.botframework.com/ you would be able to register your bot, test and connect your bot to different channels.

Bot Connector

The Bot connector is a part of the framework that allows users to connect Bots to different channels (Skype, Facebook, Slack , Kik Etc. ).This portion is part of the Azure Bot Service as well as the Bot Framework portal.

Microsoft Cognitive Services

Microsoft Cognitive Services are a set of APIs, SDKs and services available to developers to make their applications more intelligent, engaging and discoverable.

Pic3

Create your own Bot in under 10 minutes!

Bot_title

Why do you need a Bot?

Bot is the next generation of Applications. Consider this scenario, you have the below three tasks to achieve

  1. Order dinner from a restaurant
  2. Check for flights and book tickets for the coming weekend
  3. Check if the weather is appropriate to take a road trip with your friends at the end of the month

In the present-day world, you would go ahead and access three different applications on your phone.

  1. To order take out
    • You sign in to an app that pools in all the restaurants that delivers to your area.
    • Filter on the cuisine you like the most
    • Check on the delivery time
    • Check on the promotions available
    • Order your food
  2. To book your flight
    • Sign in to an app that checks for flights that displays the most economic options at times most suitable to you
    • Book the most convenient flight
  3. To Check the weather
    • Look into your weather app and check weather forecast on the date that you intend to travel.

Now the entire process above would take average of 30 minutes at best.

With the advent of Bots, that are connected to trusted sources and holding your information such as favorite cuisine, credit card information and the vacation spots that are your favorite , the above could be completed in less than 5 minutes.

Bots could recommend restaurants based on your preferences and inform you of promotions that are available on the go. Flights would also be suggested, considering the time you are most comfortable travelling. It would suggest you go ahead and make the trip a few days earlier as the weather would be most apt then.

Bot_1


What is a Bot

Bots then simply becomes a way by which users interact to get to the right information in the shortest time.

It is the short version of the word ‘Robot’.

Note, that the capabilities of a Bot , extends far beyond just ordering take out for you 😊

Microsoft Bot Framework

Microsoft Bot Framework enables you to build and connect intelligent Bots to interact with your users naturally wherever they are — from your website or app to Cortana, Skype, Teams, Office 365 mail, Slack, Facebook Messenger Skype for Business and more.

Bot_2

How can I create my first Bot?

In this video series – we will first start off with creating a simple Bot – without using any code. This method can be used by small businesses for users to get their most common questions answered.

What do I need to create my first Bot?

  1. Azure Subscription – don’t have one? No problem – Get a 30 day free trial version in 4 steps. The 4 steps are here.
  2. FAQ List in a file / URL of the FAQs in a webpage

Watch the video here.

Post this series – we will talk about how you can build conversational Bots using LUIS (Language Understanding Intelligence Service)

Hope you enjoyed this session!

Azure Identity Models demystified!

Before we delve into Identity models and how Azure authenticates users attempting to access web and or on -premise applications – lets first go over a quick overview of the Identity.

Active Directory (On-premise) is an Identity authentication store. It stores Users, Groups, Group Policies, Organizational Units, VMs within the name space. In short active directory is traditionally known to store objects within a domain.

How different is Azure Active Directory From its On-premise version?

The on-premise version can store multiple objects. By objects I mean not just users and information about those users, but also OU’s, Groups, Group Policies, VMs etc.

Azure Active Directory is an online identity store. The only object it stores is that of Users. We can then call it an online identity store. It is designed for internet-based users and applications using HTTP and HTTPS communications.

Pic1

Identity models for Azure

Below you can see a quick snapshot of the different types of identity management

Pic2

Cloud Identity

Users are created and managed in the O365 portal. The username and passwords are stored in the Azure Active Directory. The Azure AD is the cloud directory used by O365.

Pic3

Synchronized Identity

In this model, the user identity is managed in an on-premise server. The accounts and the password hashes are synchronized to the cloud. The user when attempting to sign on to a cloud application, does son, by entering the same password they enter in the on-premise environment. The AAD connect synchronizes usernames and passwords from On-premise AD to Azure AD.

Pic4

Federated Identity

This model is another version of the synchronized identity. In the federated identity model, the user’s password is verified by the on-premise identity provider. The password hash is not synchronized to the Azure Active Directory. The architecture below uses Active Directory Federation Services (AD FS) or a third-party identity provider.

Pic5

Blog at WordPress.com.

Up ↑