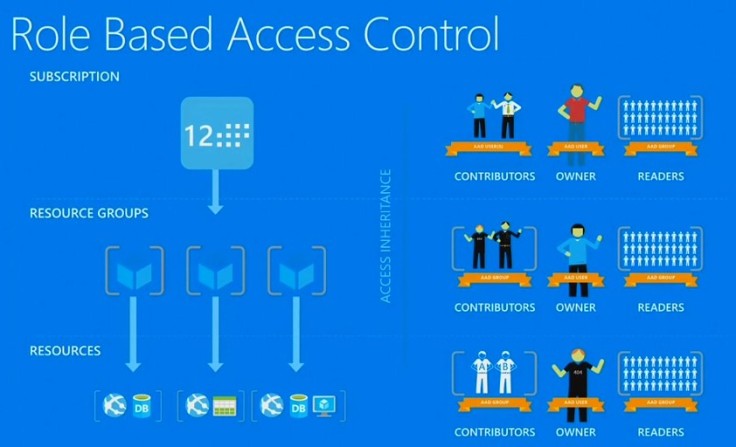
Role-Based Access Control in Azure AD

Definition of RBAC

For large organizations that have multiple resources that are grouped into resource groups, granting the right permissions to the right person is what RBAC achieves. Azure RBAC provides fine-grained access management in Azure. An example would be allowing a user to manage VMs in a subscription while another to manage SQL DBs within the same subscription.

Pic1

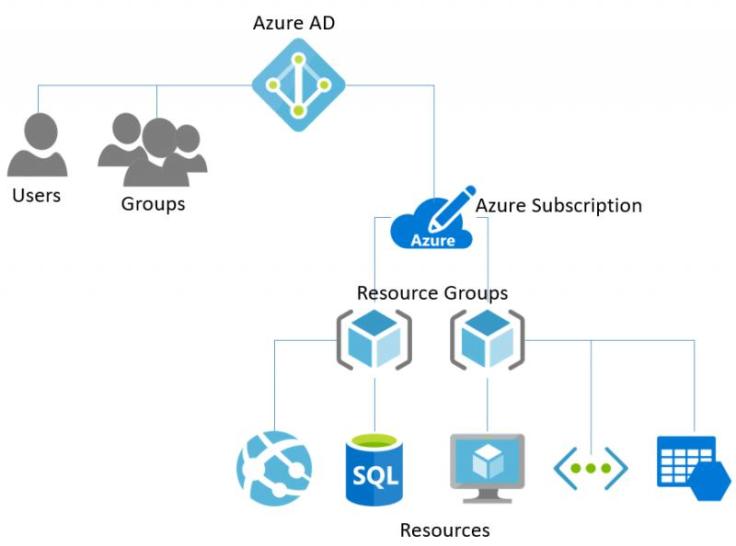
Every Azure Subscription is associated with an Azure AD. And every azure subscription has multiple resources or resource groups. Resource Groups are logical containers of resources.

Role based Access control provides the ability to grant required access to the right people of varying job descriptions.

For example, let’s say Resource Group 1 contains 2 resources, a SQL DB and multiple VMs. At a resource group level – User 1 is given the SQL DB contributor role while User 2 is given the VM Contributor role.

Resource Group User Role
Resource Group 1 User 1 SQL DB contributor (Built-In role)

Can manage SQL servers and databases, but not their security-related policies

Resource Group 1 User 2 Virtual Machine Contributor (Built-In role)

Can manage virtual machines, but not the virtual network or storage account to which they are connected

Note: Azure RBAC cannot authorize data level operations for Azure Resources. For example, the user who has the role SQL DB contributor can manage the SQL DB – it would not give permissions to manage distinct tables within the SQL DB.

Built in Roles

Azure RBAC has three basic rules that apply to all role types.

  1. Owner: A person with an ‘Owner’ access has full access to all resources including the right to delegate access to others.
  2. Contributor: A person with a ‘Contributor’ access can create and manage all types of Azure resources but can’t grant access to others.
  3. Reader: A person with a ‘Reader’ access can view existing Azure Resources.

Pic2

The rest of the below built in Roles allows management of specific Azure resources.

Role name Description
API Management Service Contributor Can manage API Management service and the APIs
API Management Service Operator Role Can manage API Management service, but not the APIs themselves
API Management Service Reader Role Read-only access to API Management service and APIs
Application Insights Component Contributor Can manage Application Insights components
Automation Operator Able to start, stop, suspend, and resume jobs
Backup Contributor Can manage backup in Recovery Services vault
Backup Operator Can manage backup except removing backup, in Recovery Services vault
Backup Reader Can view all backup management services
Billing Reader Can view all billing information
BizTalk Contributor Can manage BizTalk services
ClearDB MySQL DB Contributor Can manage ClearDB MySQL databases
Contributor Can manage everything except access.
Data Factory Contributor Can create and manage data factories, and child resources within them.
DevTest Labs User Can view everything and connect, start, restart, and shutdown virtual machines
DNS Zone Contributor Can manage DNS zones and records
Azure Cosmos DB Account Contributor Can manage Azure Cosmos DB accounts
Intelligent Systems Account Contributor Can manage Intelligent Systems accounts
Logic App Contributor Can manage all aspects of a Logic App, but not create a new one.
Logic App Operator Can start and stop workflows defined within a Logic App.
Monitoring Reader Can read all monitoring data
Monitoring Contributor Can read monitoring data and edit monitoring settings
Network Contributor Can manage all network resources
New Relic APM Account Contributor Can manage New Relic Application Performance Management accounts and applications
Owner Can manage everything, including access
Reader Can view everything, but can’t make changes
Redis Cache Contributor Can manage Redis caches
Scheduler Job Collections Contributor Can manage scheduler job collections
Search Service Contributor Can manage search services
Security Manager Can manage security components, security policies, and virtual machines
Site Recovery Contributor Can manage Site Recovery in Recovery Services vault
Site Recovery Operator Can manage failover and failback operations Site Recovery in Recovery Services vault
Site Recovery Reader Can view all Site Recovery management operations
SQL DB Contributor Can manage SQL databases, but not their security-related policies
SQL Security Manager Can manage the security-related policies of SQL servers and databases
SQL Server Contributor Can manage SQL servers and databases, but not their security-related policies
Classic Storage Account Contributor Can manage classic storage accounts
Storage Account Contributor Can manage storage accounts
Support Request Contributor Can create and manage support requests
User Access Administrator Can manage user access to Azure resources
Classic Virtual Machine Contributor Can manage classic virtual machines, but not the virtual network or storage account to which they are connected
Virtual Machine Contributor Can manage virtual machines, but not the virtual network or storage account to which they are connected
Classic Network Contributor Can manage classic virtual networks and reserved IPs
Web Plan Contributor Can manage web plans
Website Contributor Can manage websites, but not the web plans to which they are connected


Assigning a RBAC role to a user

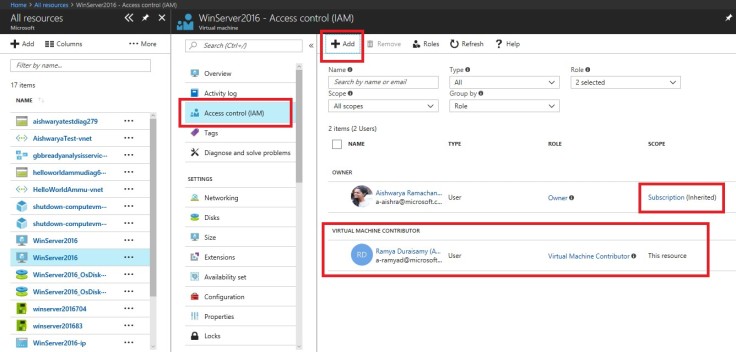
In this example – I have created a Windows Server 2016 machine and assigned a role to a user within the company.

Step 1: Click on the Access control blade of the respected resource / Resource Group

Step 2: Click on Add on the top right section of the blade

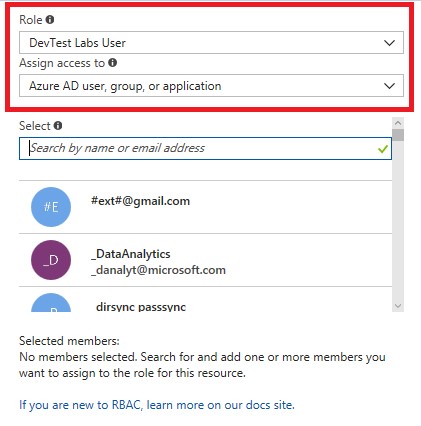
Step 3: Choose one of the built in Roles

Step 4: Assign the role to either of the below options: –

  • Azure AD user, Group, Application
  • Virtual Machine

Step 5: Review the roles assigned to users in your IAM Blade as below.

Pic3

Pic4

Custom Roles in RBAC

Apart from the built-in roles, Azure provides users with the ability to create new roles if the ones available do not serve the purpose.

Custom Roles can be created using one of the below methods: –

  1. Azure PowerShell
  2. Azure Command-Line Interface
  3. REST API

Additional Resources


Azure AD Conditional Access

Conditional access is a capability of Azure Active Directory that ensures that the right people get access to the right resources under the right conditions. This allows the admin to control how the right people access the resources and if not, the ability to deny access. For instance, what if one of your users accesses a cloud application from a highly risky IP or from a network that is not trusted? Would your application data and the user’s credentials be secure?

These questions can be addressed using conditional access. It allows you to enforce controls on the access to apps in your environment based on specific conditions. You can add additional requirements to allow access or ensure to block access if a certain criterion is not met. For example, you can ensure that users do NOT get access to sensitive data if they are accessing from a non-trusted network.

Pic1

The above is the conditional access policy that can be configured in Azure Active Directory. The conditional access policy can be translated into:-

Pic2

This means that: –

  • When this happens = Condition Statement = ‘If users access Dynamics365 from a non-trusted network’


  1. Then do this = Control = ‘Block access’

The combination of a conditional statement with a control is together called the conditional access policy.

The conditional access policies are found under the ‘Conditional Access’ section under ‘Security’ when you open your Azure Active Directory as shown in the snapshot below.

Pic3

There are conditions and controls that you can utilize to grant access to personal and sensitive data in a fine-grained manner. These include:

Group membership – this allows to control a user’s access based on membership in a group.

Location – Use the location of the user to trigger multi-factor authentication, and use block controls when a user is not on a trusted network.

Device platform – Use the device platform, such as iOS, Android, Windows Mobile, or Windows, as a condition for applying policy.

Pic4

Applications protected by Conditional Access

Azure Active Directory Conditional Access protects every application and not only Dynamics O365 and SharePoint. Any cloud, any application without a VPN. This is keeping in mind that a customer’s environment is heterogenous. Conditional access is provided to the below Microsoft Cloud Apps:-

  • Azure Information Protection
  • Azure Remote App
  • Dynamics 365
  • Yammer
  • Exchange Online
  • SharePoint
  • Power BI
  • Visual Studio Team Services
  • Teams

Other non-Microsoft applications include:-

  • Azure-AD connected applications
  • Line-of-Business Applications
  • Applications that use Azure AD application proxy
  • Applications that use password single-sign-on
  • Pre-integrated federated software as a service (SaaS) application

Pic5

Creating your first Bot in .NET (Free!)

What will you need: –

  1. Create your Bot – Visual Studio Community 2017
  2. Test your Bot – Bot Framework Emulator
  3. Azure Subscription – To host your Bot Service ; Get your Free 30 day trial version here.
  4. Account in the Bot framework Portal – To register your Bot here.

All the above options are free, you would need to spend time and not money to gain this knowledge 😊

To reiterate from the previous article, the below are the options available during each phase of creating a Bot.

Pic1

Visual Studio Community 2017

This is a free version of Visual Studio that you can download from here.

Download the Bot Application, Bot Controller, and Bot Dialog .zip files. Install the templates by copying the zip files to your Visual Studio 2017 project Templates. Visual Studio 2017 project templates directory is typically located at

%USERPROFILE%\Documents\Visual Studio 2017\Templates\ProjectTemplates\Visual C#\

Create your Bot

Open Visual Studio and create a new C# project. Choose the Bot Application template for your new project.

Pic2

By using the Bot application template, you’re creating a project that already contains all the components that are required to build a sample Bot, including a reference to the Bot builder SDK for .NET. Verify that your project references the latest version of the SDK.

  1. Right-click on the project and select Manage NuGet Packages.
  2. In the Browse tab, type “Microsoft.Bot.Builder”.
  3. Locate the Microsoft.Bot.Builder package in the list of search results, and click the Update button for that package.
  4. Follow the prompts to accept the changes and update the package.

Thanks to the Bot Application template, your project contains all the code that’s necessary to create the bot in this tutorial. You won’t need to write any additional code. However, before we move on to testing your bot, take a quick look at some of the code that the Bot Application template provided.

Explore the code

First, the Post method within Controllers\MessagesController.cs receives the message from the user and invokes the root dialog.

Pic3

The root dialog processes the message and generates a response. The MessageReceivedAsync method within Dialogs\RootDialog.cs sends a reply that echos back the user’s message, prefixed with the text ‘You sent’ and ending in the text ‘which was ## characters’, where ## represents the number of characters in the user’s message

Pic4

Test your Bot

Download the Bot Framework Emulator. This is a desktop application that allows you to test your Bot.

Run your Bot

After installing the emulator, start your bot in Visual Studio by using a browser as the application host. This Visual Studio screenshot shows that the bot will launch in Microsoft Edge when the run button is clicked. This runs on IIS express and the default port number is 3979.

Pic5

Pic6

Start the emulator and connect your bot

At this point, your bot is running locally. Next, start the emulator and then connect to your bot in the emulator:

  1. Type http://localhost:port-number/api/messages into the address bar, where port-number matches the port number shown in the browser where your application is running.

Click Connect. You won’t need to specify Microsoft App ID and Microsoft App Password. You can leave these fields blank for now. You’ll get this information later when you register your bot.
Pic7

Test your bot by writing something to your Bot.

Pic8

Now that your Bot is functional – you need to register your bot and then deploy your project to Azure.

Register your Bot on the Bot Framework

This step is done to connect your code to the Bot Framework. We get three properties once we register our Bot

  1. Bot ID
  2. Microsoft App ID
  3. Microsoft App Password

You would need to extract this information from the Bot Framework and then input it , in the web.config file of Visual Studio.

Pic9

Pic10

To create a bot, go ahead and click on ‘My Bot’. Post which go ahead and create a bot. Click on Create a bot with the bot builder SDK. And then click on ‘Register an existing Bot using Bot Builder SDK’

Pic11

Pic12

Pic13

Once you have these three fields, go ahead and insert them into the web.config file.

Pic14

Now the connection between the code and the Bot is made – which is registered on the Bot Framework portal.

Publish your Web App on Azure

You can publish your code to Azure by using the ‘Publish’ option in Visual Studio

Pic15

As a target choose the Microsoft Azure App Service.

Pic16

After you choose a name for your app , go ahead and change the type of app to a ‘Web App’

Pic17

By default, the web app is configured as a ‘Release’ version. Go ahead and change that option to ‘Deploy’ that would enable you to debug your Bot.

Pic18


Pic19

Once you publish the Web API , you would find it in the resource group mentioned above. Once you click on the web app in your Azure portal, extract the URL as shown in the snapshot below.

Pic20

You get the app name from the above URL as aishwaryabot.

Connect your Azure Web app to the Registered Bot

Enter the messaging endpoint in the Microsoft Bot Framework in the settings section of your Bot you registered in the earlier step.

The format of the messaging endpoint should be:-

https://<appname&gt;.azurewebsites.net/api/messages

And Save the changes.

Now test the bot through the Microsoft Bot framework – by connecting to channels and using the test option as shown in the screenshot below

Pic21

Conclusion

  1. You have created a Bot on Visual Studio
  2. Published your .Net code on Azure
  3. Registered a Bot and connected it to the Web app deployed in Azure
  4. Tested it in the Bot Framework and the Bot Emulator

Hope you have been able to create your first .NET bot using this article.


(Microsoft) Core Concepts to building complex Bots

Through this article lets delve into a a high-level overview of how bots can be created. Let’s understand the different methods that are available to Build, Test, Register, connect to channels and make Bots smarter.

Pic1

What is the Bot framework?

The Bot framework by Microsoft provides us with a platform to build and connect intelligent bots that interact naturally wherever your users are talking (Skype, Facebook, Slack, Web Chat Etc.). It is a collection of tools that help you to build, deploy and publish bots.

A few of the tools that build the framework are: –

  1. Azure Bot Service
  2. Bot Builder SDK
  3. Bot Framework Portal
  4. Bot Connector

Pic2

Azure Bot Service

Services provided in Azure that allows you to create, code, register, publish, connect to channels and test from your Azure portal.

The Azure Bot Service provides an integrated environment purpose built for bot development. The Azure bot service accelerates bot development with five bot templates you can choose from when you create a bot. You can further modify your bot directly using the Azure Editor or in an integrated Development environment (IDE) such as Visual Studio.

Bot Builder SDK

To help users build Bots with C# or JavaScript, the Bot framework includes the Bot Builder SDK. The SDK provides libraries, samples and tools to help you build and debug bots. The SDK contains built-in dialogs to handle user interaction ranging from a simple Yes/No to complex disambiguation. Built-in recognizers and event handlers help guide the user through conversation.

Bot Framework Portal

At this link: https://dev.botframework.com/ you would be able to register your bot, test and connect your bot to different channels.

Bot Connector

The Bot connector is a part of the framework that allows users to connect Bots to different channels (Skype, Facebook, Slack , Kik Etc. ).This portion is part of the Azure Bot Service as well as the Bot Framework portal.

Microsoft Cognitive Services

Microsoft Cognitive Services are a set of APIs, SDKs and services available to developers to make their applications more intelligent, engaging and discoverable.

Pic3

Create your own Bot in under 10 minutes!

Bot_title

Why do you need a Bot?

Bot is the next generation of Applications. Consider this scenario, you have the below three tasks to achieve

  1. Order dinner from a restaurant
  2. Check for flights and book tickets for the coming weekend
  3. Check if the weather is appropriate to take a road trip with your friends at the end of the month

In the present-day world, you would go ahead and access three different applications on your phone.

  1. To order take out
    • You sign in to an app that pools in all the restaurants that delivers to your area.
    • Filter on the cuisine you like the most
    • Check on the delivery time
    • Check on the promotions available
    • Order your food
  2. To book your flight
    • Sign in to an app that checks for flights that displays the most economic options at times most suitable to you
    • Book the most convenient flight
  3. To Check the weather
    • Look into your weather app and check weather forecast on the date that you intend to travel.

Now the entire process above would take average of 30 minutes at best.

With the advent of Bots, that are connected to trusted sources and holding your information such as favorite cuisine, credit card information and the vacation spots that are your favorite , the above could be completed in less than 5 minutes.

Bots could recommend restaurants based on your preferences and inform you of promotions that are available on the go. Flights would also be suggested, considering the time you are most comfortable travelling. It would suggest you go ahead and make the trip a few days earlier as the weather would be most apt then.

Bot_1


What is a Bot

Bots then simply becomes a way by which users interact to get to the right information in the shortest time.

It is the short version of the word ‘Robot’.

Note, that the capabilities of a Bot , extends far beyond just ordering take out for you 😊

Microsoft Bot Framework

Microsoft Bot Framework enables you to build and connect intelligent Bots to interact with your users naturally wherever they are — from your website or app to Cortana, Skype, Teams, Office 365 mail, Slack, Facebook Messenger Skype for Business and more.

Bot_2

How can I create my first Bot?

In this video series – we will first start off with creating a simple Bot – without using any code. This method can be used by small businesses for users to get their most common questions answered.

What do I need to create my first Bot?

  1. Azure Subscription – don’t have one? No problem – Get a 30 day free trial version in 4 steps. The 4 steps are here.
  2. FAQ List in a file / URL of the FAQs in a webpage

Watch the video here.

Post this series – we will talk about how you can build conversational Bots using LUIS (Language Understanding Intelligence Service)

Hope you enjoyed this session!

Azure Identity Models demystified!

Before we delve into Identity models and how Azure authenticates users attempting to access web and or on -premise applications – lets first go over a quick overview of the Identity.

Active Directory (On-premise) is an Identity authentication store. It stores Users, Groups, Group Policies, Organizational Units, VMs within the name space. In short active directory is traditionally known to store objects within a domain.

How different is Azure Active Directory From its On-premise version?

The on-premise version can store multiple objects. By objects I mean not just users and information about those users, but also OU’s, Groups, Group Policies, VMs etc.

Azure Active Directory is an online identity store. The only object it stores is that of Users. We can then call it an online identity store. It is designed for internet-based users and applications using HTTP and HTTPS communications.

Pic1

Identity models for Azure

Below you can see a quick snapshot of the different types of identity management

Pic2

Cloud Identity

Users are created and managed in the O365 portal. The username and passwords are stored in the Azure Active Directory. The Azure AD is the cloud directory used by O365.

Pic3

Synchronized Identity

In this model, the user identity is managed in an on-premise server. The accounts and the password hashes are synchronized to the cloud. The user when attempting to sign on to a cloud application, does son, by entering the same password they enter in the on-premise environment. The AAD connect synchronizes usernames and passwords from On-premise AD to Azure AD.

Pic4

Federated Identity

This model is another version of the synchronized identity. In the federated identity model, the user’s password is verified by the on-premise identity provider. The password hash is not synchronized to the Azure Active Directory. The architecture below uses Active Directory Federation Services (AD FS) or a third-party identity provider.

Pic5

File Storage

Blog8_Pic1

File storage is a storage service offered by Azure Storage. This service offers network file shares in the cloud using the industry standard Server Message Block (SMB) protocol and the Common Internet File System (CIFS).

The Azure file storage provides an OS-free cloud file share. When creating your first file share all you need to do is to specify the name of the share along with the quota (Size) of the share. Once the file is created you can go ahead and upload data into the file share.

By sharing the access key to users, they would have access to the file share created. The Access keys can be found under the settings section of the file share created.

Creating a shared file storage

STEP 1: Create a file storage

You would need to enter the name of the file share – created within a specific storage account. And also specify the quota of the memory for that file share.

Blog8_Pic2

STEP 2: Upload the files that you want to share

You can also create a directory structure within your file storage. For Azure PowerShell the below commands can be used:-

Blog8_Pic3

Blog8_Pic4

STEP 3: Connect and access your file share

We can connect to the file storage using the below attributes:-

  1. Storage Account
  2. Access key to the File storage

On Windows – map the drive for net use , the syntax is as follows :-

z: \\<storage-account-name>.file.core.windows.net\<share-name>

Blog8_Pic5


Introduction to Azure Storage

Azure Storage is a cloud storage feature provided by Microsoft that is highly durable, secure, scalable and redundant. Microsoft takes care of maintenance and handles all critical problems for you. Azure storage consists of three data services: –

  1. Blob Storage (Binary Large Object)
  2. File Storage
  3. Queue Storage: Queue Storage to pass data between servers for applications that are not interacting real time

Based on its usability, Azure storage is divided in the following: –

Blog7_Pic1

To ensure durability of data replication or redundancy is provided by Azure Storage. When setting up Azure Storage replication is automatically selected. The different types of replication methods are as below :-


Replication Option Number of copies Strategy
Locally redundant storage (LRS) Maintains three copies of your data. Data is replicated three time within a single facility in a single region.
Zone-redundant storage (ZRS) Maintains three copies of your data. Data is replicated three times across two to three facilities, either within a single region or across two regions.
Geo-redundant storage (GRS) Maintains six copies of your data. Data is replicated three times within the primary region, and is also replicated three times in hundreds of miles away from the primary region.
Read access geo-redundant storage (RA-GRS) (Default) Maintains six copies of your data. Data is replicated to a secondary geographic location, and also provides read access to your data in the secondary location.

You can choose the storage type, performance and replication methods as seen below :-

Blog7_Pic2Blog7_Pic3

Azure AD Connect

The tool that will integrate between your on-premise directory and with your Azure Active Directory is Azure AD connect. The purpose for Azure AD connect is to allow for a common identity for your users for Azure, O365 and SaaS Applications.

BlogPoast6_Pic

Reasons to use Azure AD connect: –

  • Users can use a single identity to use on-premise applications and cloud services such as O365
  • AD Connect is a single tool that provides a seamless deployment experience to synchronize and sign-in
  • Azure AD connect replaces older versions of identity tools such as DirSync and Azure AD sync


BlogPoast6_Pic1

Azure AD Components

  • Azure AD Components
  • Sync Services
  • AD FS – Active Directory Federation Services
  • Health

BlogPost6_Pic

Azure AD Connect Component Responsibility
Sync Services
  • Creates users, groups and other objects
  • Service responsible for ensuring identity information for your on-premise users and groups is matching the cloud
AD FS
  • This is an optional part of Azure AD Connect
  • Used by organizations to configure a hybrid environment with the help of an on-premise AD FS infrastructure.
  • This component is also used to address complex deployments such as Smart Card, 3rd part Multi-Factor Authentication , enforcement of SSO policy.
Health
  • This component is used to measure and monitor the heath of the syncing directories.
  • It provides a central location on the portal to view the health.

Connect Sync

Azure AD Connect Sync takes care of all the operations that are related to synchronize identity data between your on-premise environment and your Azure AD.

AD FS

Azure AD Connect allows users to configure federation with on-premise Active Directory Federation Service (AD FS) and Azure AD.

With federation sign-in, you can enable users to sign in to Azure AD-based services with their on-premise passwords and when they are on the corporate network, they would be seamlessly signed in without having to sign in again.

Azure AD Connect Health

This component of the tool allows you to monitor and gain insight into your on-premise identity infrastructure and the synchronization services. The heath component allows you to monitor key identity components such as AD FS Servers , Azure AD Connect Servers – Sync Engine , AD Domain Controllers etc.

BlogPost6_Pic2


Azure Identity: An Introduction

AAD is Microsoft’s cloud-based identity management system. AAD is a PaaS solution on Azure.

This blog provides you with an overview of Azure Active Directory and will cover the below topics:-

  • Advantages of using Azure Active directory
  • Azure AD capabilities
  • Difference between Azure Active Directory and an On-premise Active Directory
  • Different editions of Azure Active Directory

Advantages of using Azure Active directory

  1. Single Sign-On Experience
  2. Increased Accessibility
  3. Secure access to corporate social media accounts
  4. Using Multi-factor authentication and conditional access – there is more robust application security
  5. Cuts IT cost and overhead
  6. Using security reporting and monitoring you can monitor application usage
  7. Accessibility to on-premise applications.

Azure AD capabilities

  1. Multi-Factor Authentication
  2. Device Registration
  3. Self-Service Password Management
  4. Privileged Account Management
  5. Role Based Access control
  6. Application Usage Monitoring
  7. Rich Monitoring
  8. Security Monitoring
  9. Alerting

Difference between Azure Active Directory and an On-premise Active Directory

  1. AAD does not support Group policy settings
  2. AAD does not support Organization Unit (OU) or computer objects
  3. AAD does not support on ‘Forests’ (Relies on federation to end scope)

Different editions of Azure Active Directory

EditionsAAD

Azure Active Directory Basic

  • Group-based access management
  • Self-Service Password reset for cloud applications
  • Azure Active Directory Proxy (This allows to publish on-premise web applications using Azure Active Directory)

These above features are supported by an enterprise-level SLA of 99.9 percent uptime.

Azure Active Directory Premium P1

This edition has been designed for organizations with investment in identity and access management needs.

  • Enables Hybrid users to access seamlessly on-premise on cloud capabilities
  • Self-Service identity
  • Access Management
  • Identity Protection
  • Security in the cloud
  • Supports advanced administration and delegation resources like Dynamic Groups and Self-Service Group Management
  • Includes Microsoft Identity Manager
  • Provides cloud write-back capabilities enabling solutions like self-service password reset for your on-premise users

Azure Active Directory Premium P2

This is a more advanced option than Azure Active Directory Premium P1. In addition to the P1 features this edition provides new Identity Protection and Privileged Identity Management.

Privileged Identity Management: Manage and protect privileged accounts

Identity Protection

  • Leverages billions of signals to provide risk-based conditional access to your applications and critical company data
  • Discover, restrict and monitor administrators and their access to resources and provide just-in-time access when needed

For advanced feature details on each of the feature list for each edition please see here.


Blog at WordPress.com.

Up ↑